Saturday 28 December 2013

How to Hide folder name and Icon

Posted by Anonymous On Saturday, December 28, 2013 1 comment
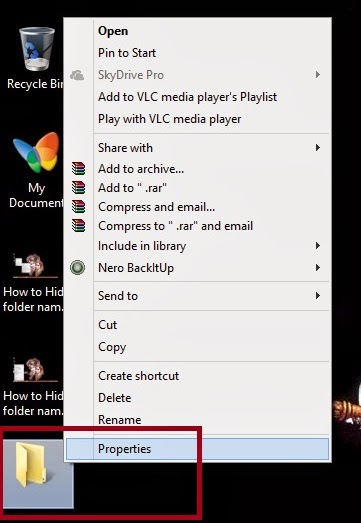
Today I shall tell you how to hide a folder name & icon without any software. This method only hides your folder icon and name. This is not protecting your folder from other people to open it. Follow the steps below.

  • Create a new folder on your computer hard drive or select a folder that you want to hide the name & icon.

Rename the folder. When you rename it, hold down Alt key and press 0160 . (When you are pressing 0160 this will show nothing.)

 
NOTE : You must on Num Lock (short for Number Lock) and use numeric keypad. Don't use the number on the top side of Alphabet keys. If you use laptop or other device where there are no extra Numerical keypad, then check the device manual to use Numerical keypad.

  • Now right click on the folder and select  Properties select the tab Customize and select Change Icon. Scroll along and you should see a few blank spaces. Click on any one and click OK and Apply the settings.
 
Now your folder name and icon is invisible. If it shows the Type i.e. File Folder, then change your view to List, Small Icons, Medium Icons or Large Icons.

How to Folder lock with password & hide without any software
In my above post I have discussed about how to hide folder name and icon without any software. Today I shall tell you how to lock a folder with password without any software. Only you need to create a batch file. So follow the steps.
  • Open a Notepad. Copy the code below and paste it into notepad.
  • Save as the notepad as NAME.bat (E.g. Folder_lock.bat).
  • Keep the batch file (Folder_lock.bat) in any hard drive or on the desktop and double click on it. It will create a new folder locker at the same location.
  • Keep the files that you want to hide and also lock with password into the folder locker. If you want to unlock your files then double click on the batch file again and type Y (for yes). Here I set the password 12345. You can change the password by editing the batch file.
Here the batch file code :

cls
@ECHO OFF
title Folder LockerByPrabirGhoshIndia
if EXIST "Control Panel.{21EC2020-3AEA-1069-A2DD-08002B30309D}" goto UNLOCK
if NOT EXIST Locker goto MDLOCKER
:CONFIRM
echo Are you sure u want to Lock the folder(Y/N)
set/p "cho=>"
if %cho%==Y goto LOCK
if %cho%==y goto LOCK
if %cho%==n goto END
if %cho%==N goto END
echo Invalid choice.
goto CONFIRM
:LOCK
ren Locker "Control Panel.{21EC2020-3AEA-1069-A2DD-08002B30309D}"
attrib +h +s "Control Panel.{21EC2020-3AEA-1069-A2DD-08002B30309D}"
echo Folder locked
goto End
:UNLOCK
echo Enter password to Unlock folder
set/p "pass=>"
if NOT %pass%==12345 goto FAIL
attrib -h -s "Control Panel.{21EC2020-3AEA-1069-A2DD-08002B30309D}"
ren "Control Panel.{21EC2020-3AEA-1069-A2DD-08002B30309D}" Locker
echo Folder Unlocked successfully
goto End
:FAIL
echo Invalid password
goto end
:MDLOCKER
md Locker
echo Locker created successfully
goto End
:End
https://www.facebook.com/chand2like

Wednesday 18 December 2013

Download AnDOSBox 1.1.6 Android apk app
Requirements: Android 1.6+
Overview: A DOSBox port for Android. DOSBox is a x86 emulator developed by DOSBox Team mainly for playing old PC games. If you never use DOS, you probably don't need this.

IMPORTANT: Like other emulators this software require sSD Card access and lots of resources to run properly. Make sure you have > 50MB free memory, and your SD Card can be accessed through / SD Card.
Features
- Portrait and Landscape mode with/without resize.
- Sound support
- Software and Hardware keyboard input
- Support entering special keys like Ctrl, ESC and Function keys
- Virtual Touch Pad and Virtual Joystick mode
 Known Issues
- On some device it failed to call out the software keyboard by itself. In this case, try longpressing the "menu" hardware key.

What's in this version:
- [fix] can now mount and boot from hdd image properly.
- For users looking for enhanced gaming keypad, please check out our "GameKeyboard" app.

Download Turbo C++ " TC " Folder
https://www.dropbox.com/s/cd8hx8ez518cum1/Turbo%20C%2B%2B.rar

Download AnDOSBox.apk File
https://www.dropbox.com/s/n2x5ow0x66p3z4k/AnDOSBox%201.1.6%20by%20Chand2.apk
 
Procedure To Install Turbo C++ In Android
1.First of download "Turbo C++.rar" Software.
2.Now download and install Easy Unrar Lite from playstore.
3.Later open Easy Unrar app and go to download folder in sdcard.
4.Select the "Turbo C++.rar" and click extract all here button.

5.All the files will be extracted and now you need to install AnDOSbox application from that files.
6.After installation of AnDOSbox application, select all the files extracted and paste it outside of download folder and then open AnDosbox and click Start Emulator.
7.A Dosbox command prompt will open, there write the following commands and turbo c will editor will open.


  1. C:\>CD TC
  2. C:\TC\CD BIN
  3. C:\TC\BIN\TC.EXE

 Enjoy Programming...

Saturday 2 November 2013

Installation Instruction

1. Download " BitDefender Total Security  2013 [32 Bit] + Crack Till 2045 "


2. Install "BitDefender Total Security  2013" .
3. Enabled Safe Mode " Change PC Setting -> General -> Advanced Option -> Chouse Safe Mode "
4. Restart Computer Normal Mode
5. Download BD2013-TR Crack
6. Run Crack/BitDefender 2013 reset/ "BD2013-TR.exe" file In Administrator Account (Right Click)

 
7. Success (Activated 11953 Days)
8. Restart PC

 
Any Problem - Comment bellow and Get help

Saturday 12 October 2013

How to Send HTML Email

Posted by Anonymous On Saturday, October 12, 2013 No comments
Using HTML to Improve Your Email Newsletters
 
Email is one of the most popular Internet tools these days, but it can be very boring and ugly. After all, it's just text, right? But what if you could use HTML to create email that looks nice, includes images and links, and makes your email exciting.

Once you start using HTML email, your email will take on the feeling of a newsletter instead of just simple notes to your friends and family. You can even set up templates to send your email in a special format depending upon what you want to write.

What Do You Need to Send HTML Email?

To send HTML email, you need an email account that supports standard email protocols like POP, IMAP, and SMTP. Your email account should also support MIME types. Nearly all Internet email accounts work with POP or IMAP and use SMTP to send mail.

You'll need an email client or Web based email program that supports sending and receiving HTML email. Thunderbird is a good free email client, or you can use a Web-based client like Gmail or Hotmail to send and receive your HTML email.

Setting up Your Email

The easiest way to send your HTML email is to write your letter in the HTML editor in your mail client. Most modern mail clients now support embedding images, changing fonts, and adding colors and so on.

You should think of the email message as an extension of your Web site. Post the images on your Web site, and then when you link to them in your email message point to your Web site for the image source.

Be sure to use absolute paths. For both images and links. Remember, your readers are going to be at all different locations, so you need to use absolute paths in an HTML email to ensure that the images display and the links work.

How to Send Your Mail

Once you've built your HTML email, you send it with an email client that supports HTML email, like Netscape Messenger, Microsoft Outlook, Eudora, and others. In most of these clients, you will need to find the correct setting to set up HTML email.

Netscape Messenger (4.7):
  • Click on "Edit" and choose "Preferences"
  • Choose "Formatting"
  • Make sure "Use the HTML editor to compose messages" is selected
  • Decide how you want people who can't read HTML email to receive it
  • Click "OK"
Outlook Express:
  • Click on "Tools" and choose "Options"
  • Switch to the "Send" tab
  • Make sure that the Mail sending format is "HTML"
  • Click "OK"
Thunderbird
  • Choose Message > New Message or Ctrl-M 
  • Use the Thunderbird editor to add your HTML into your message directly 
Sending HTML Email Tricks
  • Some mail clients will let you use the <base href=""> tag in the <head> of your HTML email, but not all email clients support that tag
  • Background images (in the <body> tag) only work in some email clients
  • The bgcolor attribute works best if you put it in a table, and enclose your entire email in a single celled table
  • Most email clients that support HTML email, only support a limited version of HTML, it's best to avoid more complex things like frames in your email
Remember, Not Everyone Has HTML Email

If you send HTML email to a person who's email client doesn't support it, they will get the HTML as plain text. Unless they are a Web developer, comfortable with HTML, they may see the letter as a lot of gobbledegook and delete it without attempting to read it.

If you're sending out an email newsletter, you should give your readers the opportunity to choose HTML email or plain text. If you're just using it to send to friends and family, you should make sure they can read HTML email before sending to them.
 

Monday 7 October 2013

How to install wordpress on Xampp server in Windows 8

Posted by Anonymous On Monday, October 07, 2013 1 comment
How to Install Wordpress on XAMPP
The goal of this guide is to show web designers how to install Wordpress [1] (2.8 or above) locally on their computers for the purpose of designing and testing Wordpress themes. Wordpress requires that the computer you are installing to has a web server (such as Apache, Litespeed, or IIS), PHP 4.3 or greater, and MySQL 4.0 or greater.

XAMPP [2] is an easy to install web server environment, which has all the previously mentioned components. All of the following instructions are based on the assumption that you have a XAMPP installation running locally on your machine. This tutorial does not discuss the installation of XAMPP. For more information about XAMPP, go to the official XAMPP (http://www.apachefriends.org/en/xampp.html) web site.

Step 1: Download and save the latest version of Wordpress from the following link: http://wordpress.org/download/
 
 
Step 2: Extract the contents of the ZIP file called "wordpress.zip", which was downloaded in step 1, to the htdocs folder within the XAMPP directory.If ZIP file extracted properly there should be a new directory called "wordpress" within the \xampp\htdocs directory.
 
Before the process can move forward, please ensure that the web server environment is running properly.
 
Step 3: Go to the XAMPP main page by opening a web browser and entering the following URL:
http://localhost/xampp/

Step 4: Select the link called "phpMyAdmin" on the lower left side of the menu or by entering the following URL: http://localhost/phpmyadmin/

Step 5: At the phpMyAdmin main page, there will be an area in the middle of the screen called "MySQL localhost". From this section a new database will be created for use by the Wordpress installation.

  • In the field labeled "Create new database" enter the name "wordpress". From the dropdown labeled "Collation" select "utf8_unicode_ci". Then press the button labeled "Create".
  • If the database entry was created successfully the message "Database wordpress has been created" should be displayed.

Step 6: Using the Windows Explore navigate to the xampp\htdocs\wordpress directory. Open the file called "wp-config-sample.php" within the wordpress directory.


Step 7: Once the file has been opened edit the following lines:

/** The name of the database for WordPress */
 define('DB_NAME', 'putyourdbnamehere'); ==> change 'putyourdbnameheree' to 'wordpress'

 /** MySQL database username */
 define('DB_USER', 'usernamehere'); ==> change 'usernamehere' to 'root'

 /** MySQL database password */
 define('DB_PASSWORD', 'yourpasswordhere'); ==> change 'yourpasswordhere' to ' ' (leave it blank)
 
Step 8: When the file has been edited as described in the previous step, save a copy of the file as "wp-config.php" in the wordpress directory and close the file.

Step 9: Go to the Wordpress Installation page by opening a web browser and entering the following URL:
http://localhost/wordpress/wp-admin/install.php

Step 10: Enter a title for the blog in the field labeled "Blog Title". Enter an email address in the field labeled "Your E-mail". Then press the button labeled "Install Wordpress".


Step 11: If the information in the previous step was entered correctly there should be a new screen titled "Success!". This screen presents a username called "admin" and a temporary password. It is a randomly generated password so it is important to make note of it until a new password has been selected. Press the button labeled "Log In".


Step 12: At the Log In screen type the word "Admin" in the field labeled "Username" and type the temporary password, which was created in the previous step, in the field labeled "Password". Press the button labeled "Log In".

Step 13: If the log in was successful then the Wordpress Dashboard appears. There is a notice which states that an auto-generated password is being used and to change it to something easier to remember. The link labeled "Yes. Take me to my profile page" allows the temporary password to be changed. Once the password has been changed editing of the content and themes can begin.

 
https://www.facebook.com/chand2like

Tuesday 17 September 2013

Turn off and On Internet Explorer desktop mode in Windows 8

Posted by Anonymous On Tuesday, September 17, 2013 1 comment
How to open Internet Explorer always on Default full screen mode.

Open Settings - Internet Options - Program (Tab)

Chose " Open Internet Explorer tiles on the Desktop "

Mark and Unmark


Sunday 8 September 2013

How can I format a write protected pen drive?

Posted by Anonymous On Sunday, September 08, 2013 1 comment
Download Neo 9 tool able to get past the write protection and format the pen drive
http://www.box.net/shared/9hgp81ndgs

or
1.Go to Run - regedit
2.MyComputer
              HKEY_LOCAL_MACHINE
                        SYSTEM
                                  Current Control Set
                                                Control
                                                           Storage Device Policies
3.Delete the StorageDevicePolicies in Your Registry.


OR

1. Start - CMD (Command Prompt)
2. type< diskpart
3. type< list disk
4. type< select disk # (# is the number of the USB key)
5. type< attributes disk clear readonly
 

Saturday 31 August 2013

Make you own Viruses

Posted by Anonymous On Saturday, August 31, 2013 No comments


Open Microsoft Word
OpenWord.bat

@echo off
REM Next command opens Microsoft Word
start /d "C:\Program Files\Microsoft Word" WINWORD.EXE
________________

Say Hello

Hello.bat

@echo off
REM Next command inputs the greeting
echo Hello! This a sample batch file.
REM Next command displays “Press any key to continue” and waits for user to press a key
pause
dir c:\windows

________________


Create a list of program files
ProgramList.bat

@echo off
REM Next command creates a list of program files in the computer’s C:\ drive
dir "C:\Program Files" > C:\list_of_program_files.txt

List of All Windows keyboard Shortcuts Keys

Posted by Anonymous On Saturday, August 31, 2013 1 comment
 
·         ALT+- (ALT+hyphen) Displays the Multiple Document Interface (MDI) child window's System menu

·         ALT+ENTER View properties for the selected item

·         ALT+SPACEBAR Display the System menu for the active window

·         ALT+F4 Close the active item, or quit the active program

·         ALT+ESC Cycle through items in the order they were opened

·         ALT+ Underlined letter Display the corresponding menu

·         ALT+TAB Switch between open items

·         BACKSPACE View the folder one level up in My Computer or Windows Explorer

·         CTRL+X Cut

·         CTRL+A Select all

·         CTRL+B Bold

·         CTRL+I Italics

·         CTRL+C Copy

·         CTRL+Z Undo

·         CTRL+O Open an item

·         CTRL+U Underline

·         CTRL+V Paste

·         CTRL while dragging Copy selected item

·         CTRL+F4 Close the active document

·         CTRL+SHIFT while dragging Create shortcut to selected item

·         CTRL+LEFT ARROW Move the insertion point to the beginning of the previous word

·         CTRL+DOWN ARROW Move the insertion point to the beginning of the next paragraph

·         CTRL+RIGHT ARROW Move the insertion point to the beginning of the next word

·         CTRL+UP ARROW Move the insertion point to the beginning of the previous paragraph

·         SHIFT+DELETE Delete selected item permanently without placing the item in the Recycle Bin

·         ESC Cancel the current task

·         F1 Displays Help

·         F2 Rename selected item

·         F3 Search for a file or folder

·         F4 Display the Address bar list in My Computer or Windows Explorer

·         F5 Refresh the active window

·         F6 Cycle through screen elements in a window or on the desktop

·         F10 Activate the menu bar in the active program

·         SHIFT+F10 Display the shortcut menu for the selected item

·         CTRL+ESC Display the Start menu

·         SHIFT+CTRL+ESC Launches Task Manager

·         SHIFT when you insert a CD Prevent the CD from automatically playing

·         WIN Display or hide the Start menu

·         WIN+BREAK Display the System Properties dialog box

·         WIN+D Minimizes all Windows and shows the Desktop

·         WIN+E Open Windows Explorer

·         WIN+F Search for a file or folder

·         WIN+F+CTRL Search for computers

·         WIN+L Locks the desktop

·         WIN+M Minimize or restore all windows

·         WIN+R Open the Run dialog box

·         WIN+TAB Switch between open items


Windows Explorer Shortcuts:

·         ALT+SPACEBAR - Display the current window’s system menu

·         SHIFT+F10 - Display the item's context menu

·         CTRL+ESC - Display the Start menu

·         ALT+TAB - Switch to the window you last used

·         ALT+F4 - Close the current window or quit

·         CTRL+A - Select all items

·         CTRL+X - Cut selected item(s)

·         CTRL+C - Copy selected item(s)

·         CTRL+V - Paste item(s)

·         CTRL+Z - Undo last action

·         CTRL+(+) - Automatically resize the columns in the right hand pane

·         TAB - Move forward through options

·         ALT+RIGHT ARROW - Move forward to a previous view

·         ALT+LEFT ARROW - Move backward to a previous view

·         SHIFT+DELETE - Delete an item immediately

·         BACKSPACE - View the folder one level up

·         ALT+ENTER - View an item’s properties

·         F10 - Activate the menu bar in programs

·         F6 - Switch between left and right panes

·         F5 - Refresh window contents

·         F3 - Display Find application

·         F2 - Rename selected item


Internet Explorer Shortcuts:

·         CTRL+A - Select all items on the current page

·         CTRL+D - Add the current page to your Favorites

·         CTRL+E - Open the Search bar

·         CTRL+F - Find on this page

·         CTRL+H - Open the History bar

·         CTRL+I - Open the Favorites bar

·         CTRL+N - Open a new window

·         CTRL+O - Go to a new location

·         CTRL+P - Print the current page or active frame

·         CTRL+S - Save the current page

·         CTRL+W - Close current browser window

·         CTRL+ENTER - Adds the http://www. (url) .com

·         SHIFT+CLICK - Open link in new window

·         BACKSPACE - Go to the previous page

·         ALT+HOME - Go to your Home page

·         HOME - Move to the beginning of a document

·         TAB - Move forward through items on a page

·         END - Move to the end of a document

·         ESC - Stop downloading a page

·         F11 - Toggle full-screen view

·         F5 - Refresh the current page

·         F4 - Display list of typed addresses

·         F6 - Change Address bar and page focus

·         F1 - Display Internet Explorer Help

·         ALT+RIGHT ARROW - Go to the next page

·         SHIFT+CTRL+TAB - Move back between frames

·         SHIFT+F10 - Display a shortcut menu for a link

·         SHIFT+TAB - Move back through the items on a page

·         CTRL+TAB - Move forward between frames

·         CTRL+C - Copy selected items to the clipboard

·         CTRL+V - Insert contents of the clipboard

·         ENTER - Activate a selected link

·         HOME - Move to the beginning of a document

·         END - Move to the end of a document

https://www.facebook.com/chand2like

Site search

    Submit URL