
How to Install Wordpress on XAMPP
 Step 2: Extract the contents of the ZIP file called "wordpress.zip", which was downloaded in step 1, to the htdocs folder within the XAMPP directory.If ZIP file extracted properly there should be a new directory called "wordpress" within the \xampp\htdocs directory.
Before the process can move forward, please ensure that the web server environment is running properly.
 Step 3: Go to the XAMPP main page by opening a web browser and entering the following URL:
http://localhost/xampp/
Step 4: Select the link called "phpMyAdmin" on the lower left side of the menu or by entering the following URL: http://localhost/phpmyadmin/
.jpg)
Step 5: At the phpMyAdmin main page, there will be an area in the middle of the screen called "MySQL localhost". From this section a new database will be created for use by the Wordpress installation.
.jpg)
Step 6: Using the Windows Explore navigate to the xampp\htdocs\wordpress directory. Open the file called "wp-config-sample.php" within the wordpress directory.
.jpg)
Step 7: Once the file has been opened edit the following lines:
/** The name of the database for WordPress */
define('DB_NAME', 'putyourdbnamehere'); ==> change 'putyourdbnameheree' to 'wordpress'
/** MySQL database username */
define('DB_USER', 'usernamehere'); ==> change 'usernamehere' to 'root'
/** MySQL database password */
define('DB_PASSWORD', 'yourpasswordhere'); ==> change 'yourpasswordhere' to ' ' (leave it blank)
.jpg) Step 8: When the file has been edited as described in the previous step, save a copy of the file as "wp-config.php" in the wordpress directory and close the file.
Step 8: When the file has been edited as described in the previous step, save a copy of the file as "wp-config.php" in the wordpress directory and close the file.
Step 9: Go to the Wordpress Installation page by opening a web browser and entering the following URL:
http://localhost/wordpress/wp-admin/install.php
.jpg)
.jpg)
.jpg)
Step 11: If the information in the previous step was entered correctly there should be a new screen titled "Success!". This screen presents a username called "admin" and a temporary password. It is a randomly generated password so it is important to make note of it until a new password has been selected. Press the button labeled "Log In".
.jpg)
Step 12: At the Log In screen type the word "Admin" in the field labeled "Username" and type the temporary password, which was created in the previous step, in the field labeled "Password". Press the button labeled "Log In".
Step 13: If the log in was successful then the Wordpress Dashboard appears. There is a notice which states that an auto-generated password is being used and to change it to something easier to remember. The link labeled "Yes. Take me to my profile page" allows the temporary password to be changed. Once the password has been changed editing of the content and themes can begin.
.jpg)
.jpg)

The goal of this guide is to show web designers how to install Wordpress [1] (2.8 or above) locally on their computers for the purpose of designing and testing Wordpress themes. Wordpress requires that the computer you are installing to has a web server (such as Apache, Litespeed, or IIS), PHP 4.3 or greater, and MySQL 4.0 or greater.
XAMPP [2] is an easy to install web server environment, which has all the previously mentioned components. All of the following instructions are based on the assumption that you have a XAMPP installation running locally on your machine. This tutorial does not discuss the installation of XAMPP. For more information about XAMPP, go to the official XAMPP (http://www.apachefriends.org/en/xampp.html) web site.
Step 1: Download and save the latest version of Wordpress from the following link: http://wordpress.org/download/
http://localhost/xampp/
Step 4: Select the link called "phpMyAdmin" on the lower left side of the menu or by entering the following URL: http://localhost/phpmyadmin/
Step 5: At the phpMyAdmin main page, there will be an area in the middle of the screen called "MySQL localhost". From this section a new database will be created for use by the Wordpress installation.
- In the field labeled "Create new database" enter the name "wordpress". From the dropdown labeled "Collation" select "utf8_unicode_ci". Then press the button labeled "Create".
- If the database entry was created successfully the message "Database wordpress has been created" should be displayed.
Step 6: Using the Windows Explore navigate to the xampp\htdocs\wordpress directory. Open the file called "wp-config-sample.php" within the wordpress directory.
Step 7: Once the file has been opened edit the following lines:
/** The name of the database for WordPress */
define('DB_NAME', 'putyourdbnamehere'); ==> change 'putyourdbnameheree' to 'wordpress'
/** MySQL database username */
define('DB_USER', 'usernamehere'); ==> change 'usernamehere' to 'root'
/** MySQL database password */
define('DB_PASSWORD', 'yourpasswordhere'); ==> change 'yourpasswordhere' to ' ' (leave it blank)
Step 9: Go to the Wordpress Installation page by opening a web browser and entering the following URL:
http://localhost/wordpress/wp-admin/install.php
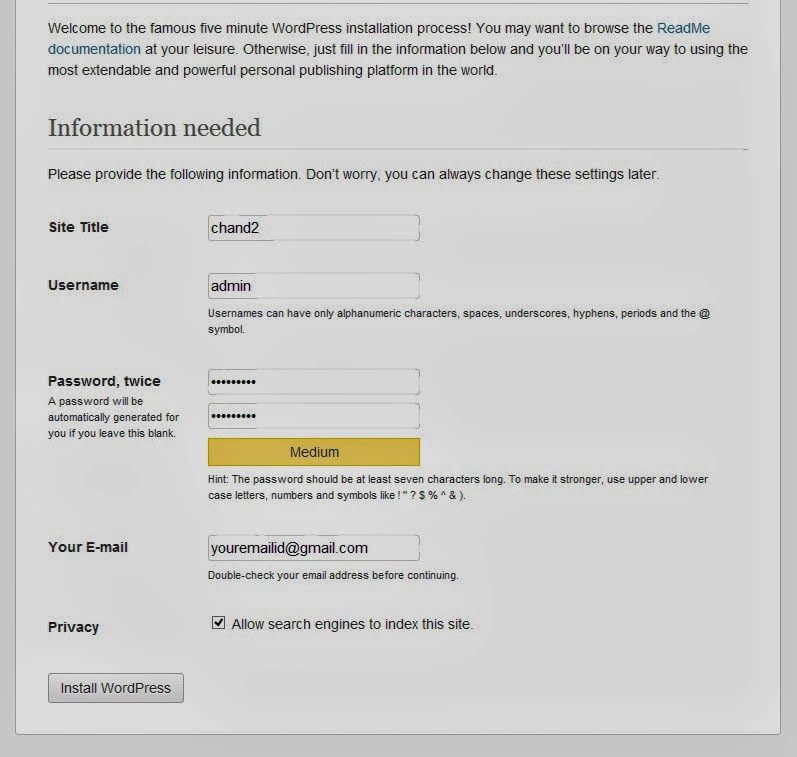
Step 10: Enter a title for the blog in the field labeled "Blog Title". Enter an email address in the field labeled "Your E-mail". Then press the button labeled "Install Wordpress".
Step 11: If the information in the previous step was entered correctly there should be a new screen titled "Success!". This screen presents a username called "admin" and a temporary password. It is a randomly generated password so it is important to make note of it until a new password has been selected. Press the button labeled "Log In".
Step 12: At the Log In screen type the word "Admin" in the field labeled "Username" and type the temporary password, which was created in the previous step, in the field labeled "Password". Press the button labeled "Log In".
Step 13: If the log in was successful then the Wordpress Dashboard appears. There is a notice which states that an auto-generated password is being used and to change it to something easier to remember. The link labeled "Yes. Take me to my profile page" allows the temporary password to be changed. Once the password has been changed editing of the content and themes can begin.


.jpg)

He is a professional hacker, he is absolutely reliable and I strongly recommend him for any types of hacking jobs you require. why i said this is because I have engaged him severally in various hacking jobs and he has never disappointed me nor any of my friends who have hired him also, He has really proven himself to be a professional and a reliable hacker, He can help you out with any hacking jobs including this:
ReplyDelete-Cell Phones hacking (remotely)
-Credit Repair
-Bitcoin Recovery (Any type of Cryptocurrencies)
-Make money from Home (Any Countries)
-Social media Hacking
-Website Hacking
-Erasing of criminal Records (Any Countries)
-Grade Change
Email him via: hackingsetting50@gmail.com